Home
Photos
Publishing
Weebly
Inkscape
Flickr
& Picasa
|
|
Using Inkscape
If you’d like to have a go
at creating computer-generated graphic
art, then Inkscape is one of the software programs to go for. It is
free of charge, and can be downloaded from ....
http://www.inkscape.org
There are lots of tutorials available on the internet, showing you
how to use Inkscape. The complexity of some of the tutorials
illustrated on the first website, is mind-blowing ....
http://inkscapetutorials.wordpress.com/
Here is just one of the tutorials from this site, if you’d like to
have a go at making a steaming cup of coffee
http://tiny.cc/T6Aod A few months ago, I had a
look at this video on how to make
a shiny red button, following which I had a go at making a blue
one for the Nottm U3A website.
https://www.youtube.com/watch?v=pcXGncj2Ato&hl=un
|
|
|
Here is my blue button …
...and here are my notes on how to
do this, based on the above
video presentation ....
Open up the Inkscape program.
Start your work above the “A4”
white page (the black-edged rectangle) on the screen.
Enlarge the
whole page view at top of A4 page on screen, so you can
clearly see the
grid 0-150 at the top on the screen. (The zoom tool is towards the top of the LH toolbar).
The button
will be 150 units across and about 50 units deep. A lot of the following
procedures are done with the button or text “selected” … the select tool is above the
zoom tool (the diagonal arrow) …
click on this and then click on the button to select it.
Next, click
on the rectangle tool on the LHTB, and draw a rectangle from 0
across the
screen to 150 (create this
above the A4 page). Click on the top right corner of the
button, and move it to create how round to
make the corners (you only get one stab at
this)
Use the long
colour chart at the bottom to select a colour for your button… click on a
colour.
Select tool > click on button > Rt mouse click > Duplicate
With the
button still selected, use the mouse pointer to drag the top duplicate copy to
one side (to make sure that you have a duplicate). Reposition.
Change the top copy to colour black / 80% black
Select the
gradient tool (at the bottom of the LHTB). Click just
below the button (at
75 units level) and drag the gradient tool upwards …. the top copy almost vanishes
but reappears slightly as you drag the gradient tool up over the button. The angle of
your upwards gradient is tricky to get right. The overall aim is to create the illusion of
a slight shadow at the bottom of the button.
Now to create a shiny elliptical area at
the top of the button.
Create a second duplicate copy …. Select tool
> click on button > Rt mouse click
> Duplicate. Check this
has worked by moving the top copy away & then back
again. Change the colour to grey.
Click on the CIRCLE tool (on the LHTB), and create an ellipse above the button …
you might have to drag one of the little nodes around to fully create the ellipse, and
then drag the middle lower node downwards to widen it. Make the ellipse slightly
larger than the button.
Change the colour of the ellipse to a pale olive green.
Select the ellipse & drag it down to be partially over the top of the button.
Press the
Shift key and the left key of your mouse on the button, so both the
button
and the ellipse are selected together. On the Top toolbar (TTB), click on Paths >
intersection. Only the common intersected area of the ellipse now remains.
Change the colour of the partial ellipse (PE) to white. With the PE selected, click on the
gradient tool, and click just above the PE
and drag the GT down over the PE to get a
graduated colour effect.
Select Paths > INSET. This insets
the PE into the button
Now to add some text...
Click on the Text tool in the LHTB (the icon with a letter A on it) Select a font & size
you like eg Lucida Bright font ~ size 14. Type in the text you want just above the
button eg Click to go to top
Select the
text with the select tool … resize and reposition it over the button. To get
the
pale PE (which is partially transparent) over the top of the text …. Click on Object
(on TTB) > “Raise to top”.
Now to SAVE your work….
Inkscape creates Bitmaps and “exports” them as .png files to wherever you want.
Click on File > Export to/as Bitmap
You have to
go through two pop-up menus, specifying the filename you’d like (eg
closetotop2) and which folder on your
computer to save it in eg My
Pictures. Don’t
forget to click the
button “Export” at the end of this. Check your folder (eg My
Pictures) to see if you have saved your work, before
deleting it.
I found that the .png file was bordered by a fine dark blue border, when I came to use
it
on my website. The png image size was 150 x 50. In Gimp/Photoshop, you can convert
the png image to jpeg one … this should get rid of the transparent edges to the button.
.....................................................................................
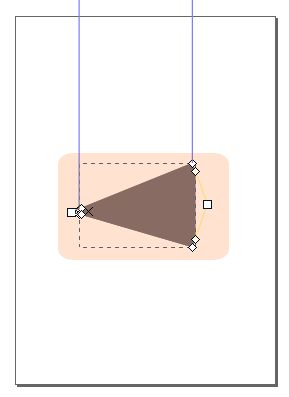
Creating a “next page” button
I had a play with Inkscape to create the button you’ll see at
the bottom of the first Gimp page on this website.
Use the Rectangle tool to create a small
rectangle within the black rectangle on the
Inkscape page. (I found I couldn’t create this button by using the space outside the black
rectangle). Click on one of the colours on the horizontal rainbow at the bottom of the page,
to add some background colour.
Using
the 3-D box tool, just below the
rectangle tool, click inside the rectangle you’ve
just drawn, on a point to the left of centre, and drag your mouse across to the right. Let go
of the mouse, and now you’ll see a pointy cuboid image, suspended by 2 trapeze wires,
and various nodes dotted around the image. You can tweak all these to create a triangle,
and then colour it in as above.
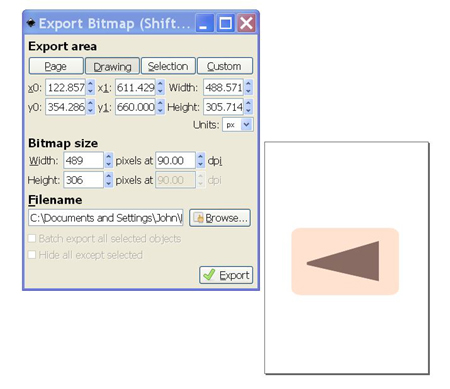
To save your image ….
File > Save As … this will save your work as an SVG file, which you can work on
at a
later date in Inkscape.
File > Export as Bitmap … is the way to go if you wish to save it as a PNG file.
You can convert this to a jpeg image in Gimp, flip it around (so that the arrow is pointing to
your right), and shrink the image size down to say around 50 pixels across, for website use.
.....................................................................................
Another idea for you, is to have a go at producing your own bullet
points with Inkscape.
I used the polygon/star icon to produce a medium-sized star shape with 5
corners. Along the top toolbar, you can choose what options you'd like. As
you create the star with your mouse, keep your mouse key pressed down,
and then you can rotate the star if you so wish. At the bottom left of the
screen, just under the rainbow, you'll see a little "O" for opacity. You can
change the intensity of your colour here. Using Gimp you can reduce the
size of your star image down to a 10x10 pixel square, for use as a bullet point.
.....................................................................................
For a bit of fun, I had a go at creating the “Stars & Stripes”, using
the Rectangle tool for the blue rectangle, the Stars tool (two icons
below the 3-D box tool), and the Calligraphic brush tool for the
stripes. If you want straight lines, I think you’d have to use a digital
pen and a graphics pad. I could only draw wavy lines with my
mouse (and these lines weren’t very good). I added the photo and
text later.
As you can see, my knowledge of Inkscape is very
limited, but you
can get a long way by copying what’s given in the internet tutorials.
|