Home
Photos
Publishing
Weebly
Flickr
& Picasa
|
|
Flickr & Picasa
1. Flickr
I think
Flickr is fabulous, and I recommend you try it out for personal and for
U3A
use.
Flickr is owned by Yahoo, and offers free web-hosting for up to 1 terabyte of
your photos
and small videos.
If you need to put more photos on, (& create a lot of sets of your
photos), you can pay for an upgrade ... check out the Flickr site for the current charges
and what you're paying extra for. The free version is supported by showing adverts on
your site. I've read that you can block the adverts by downloading Adblock onto your
computer.
You
have
the option to display your photos to a selected group of family
& friends,
or
you can open it up to entire public … the basic idea is photo-sharing ~ sharing your
photos with other people.
Signing up for Flickr is
easy-peasy. In doing so, you’ll create an account with
Yahoo,
if you haven’t already got one (with
having a Yahoo email address).
Remember to jot
down your username and your password … ideally the latter
should be about 10
characters in length and contain some numbers as well as
letters. |
|
|
|
Remember also
to
jot down / copy and email to yourself your full Flickr website
address (aka
its URL). You can also save this webpage in your “Favourites” internet
column, for
future access.
My personal Flickr site is …. http://www.flickr.com/photos/14836724@N00/
In the address
box at the top of the
Flickr page, just click in the white space just
after the Flickr URL … this
will highlight the address in blue.
Copy ~ Control + letter C. …
Paste ~ Control + letter V … to wherever you so wish.
When you’re
uploading
jpeg photos onto Flickr, ideally they should be about 700-800px
in
width (for photos in landscape format) and 100 – 200kb in size. These
will look
lovely
when viewed on a computer monitor, but will look rubbish if anyone
tries
to download
them and then print them out. (The optimal resolution for printing is 300 px per inch, so
to print a 6 x 4 photo, ideally you need to use a digital image size of 1800 x 1200 px.)
As regards uploading one or more photos, simply click on the Upload button at the top
of the Flickr page. The next webpage will give you a choice of uploading a batch of
photos by "drag and drop" from a photo folder, or select "Choose photos or videos" from
your computer, one by one. I favour the latter, so I can order my photos in time sequence
more easily, though you can move added photos around the waiting room, by dragging
them to new positions. At this stage, you can add descriptions to photos, and set
privacy levels for each photo via "Owner Settings" (see the left hand column). You can
also delete any photos at this stage (click on a photo and click on the "x" at the top
right hand corner). Finally you can click on the Upload button to upload the whole batch.
I'm gradually working out how to find my way around the Flickr site, after its major
revision in May 2013. A lot of extra features of Flickr have been hidden from view by
the designers, making it less user-friendly in my opinion. It's more difficult to see if
anyone has commented on your site (or sent you an email via Flickrmail). For an
update on how to find these hidden features, click HERE to see my photoblog article.
On the plus side, you can now create a header image for your site, and also add a larger
photo of yourself (your buddy icon).
On my WordPress site, I've lost my former link to my Flickr site (via WP's Flickr widget).
I can't work out how to set this back up again, so instead I've created a text link to my
Flickr site using the following bit of linking HTML code, from the following website ...
http://www.w3schools.com/html/html_links.asp
Here is the code ... <a href="url">Link text</a>
Have a look at the right hand side bar on my blogsite, to see how clicking on the word:
"HERE", takes you through to my Flickr site. |
By the way. if
you wish to upload a photo with some text on it, onto your website,
add the text onto the same size of image you wish to upload. If you were to alter
the size of photo on your webpage, then this could distort the text or make it look
fuzzy.
Another option for web designers is to create two sizes of a photo, saving them to
your website folder. You
could add the smaller one to your website and then create a link from
the smaller photo to the larger one, & invite viewers to click on the small
photo to see a larger version. You will need to upload
both photos onto the internet,
to
be able to see both of them. I have done this for the collage
photo below.
|
PICASA 3
Picasa 3 is
a wonderful program, which is available free of charge from Google.
It’s
very
easy to download … just google it and download it from the
Google site.
Once it’s downloaded, Picasa will offer you two options ~ a complete scan of
all the
photos on your computer, and a scan of photos on your Desktop, in (My)
Documents
and in (My) Pictures. The latter scan will
display all the photos on your computer,
folder by folder, and in date order,
so you can find any photos / folders that you've
lost inside your computer. I don’t like Picasa's photo-viewer as my main photo-viewer,
so I unticked that option
when Picasa offered it to me.
Picasa also
offers you an array of photo-editing
options … most of these are
brilliant,
such as the vertical re-alignment of buildings, window frames and the
like.
You
can easily remove “red eye” with Picasa. Another brilliant thing about
Picasa
is
the collage
feature, whereby you can create a photo-montage of your photos.
To create a
collage … click on the Help
button at the top of the
screen >
“Collages,
Movies, and Slideshows”. Select “Creating a collage”, and
follow the
instructions. Have a look through the “collage style” and the
“settings” sections too. There are several YouTube videos on how to create a picture collage ... HERE is an
excellent one on the subject.
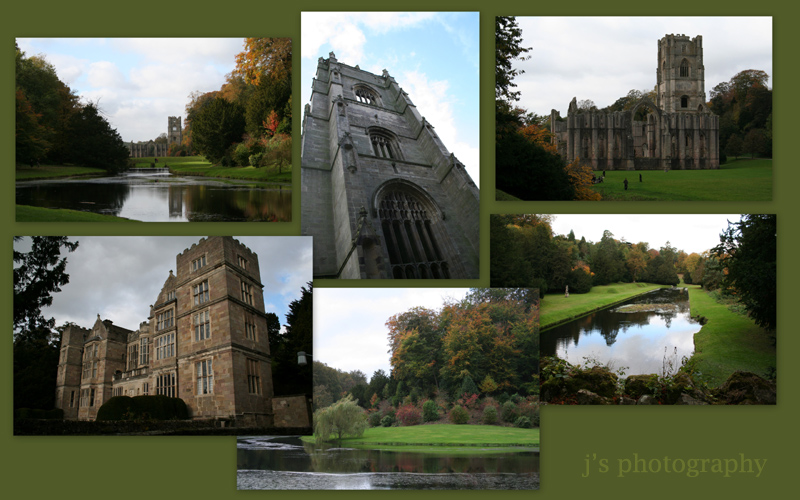
Below is a collage I made in about 5 minutes, having selected a few
photos I took
at
Fountains Abbey in Yorkshire recently. It’s
very easy to change the position, size and
angle of each photo, and to change the colour of the background too. |
 |
(click on above photo)
I
made two reduced sizes of this collage, one 800 pixels in width, the
other
460px in
width, and have created a link from the smaller photo (above) to the
larger photo (which
I've uploaded onto Angelfire also). Click on the smaller photo
to see the larger one.
The following section on Picasa web albums may be out of date by now, as Google
appears to be phasing this out in favour of its Google + Photos. Have a look at the
following article ... http://tinyurl.com/b7ybh6z
If you're interested in creating a Picasa web album, have a look at an article which
I've written HERE. This article is based on a talk I gave in August 2012, Two main points
frrom this talk: to preserve the quality of the photos you wish to upload to PWA, upload
the photos directly from your computer, and not via Picasa. Secondly, Picasa allows
you to upload any number of photos free of charge, provided that the dimensions of
each photo do not exceed 800 pixels.
|
|