|
Video tutorials
The
Gimp website contains useful
tutorials and a Help section, but I
can recommend you have a look at YouTube for any Gimp
topic you
so wish. Most of these will be somewhat out of date however ... when
each version of Gimp is published, there are slight changes in the
layout or in the way it works.
BTW,
see a full screen version of a YouTube video,
click on the icon at the
bottom right hand corner of the YouTube screen. To escape the
full screen view, press
the Escape key on your keyboard).
The Gimp Interface
Please note that Gimp will take 30 secs - 2 or 3 minutes to start
up, especially the first time you use it.
The
optimal appearance of Gimp is as below.
After opening Gimp up,
you will need to change the size & position of each panel to
get this
looking OK. Click on the blue bar at the top of one of the
panels and
drag it to a new position with your mouse. If you point your mouse at
the right-hand / bottom edges / the lower right-hand corner of a panel
you can then grab and drag it, to re-size the panel.
If either of the right hand
panels is missing,
search for it under
Windows on the top toolbar > "Recently closed
docks". The Undo
History panel is now separate from the Layers panel, and is often
hidden behind it, so you will have to re-position them. The special
tool box for each tool in the left hand column is now separate too.
You will have to click on this to bring it on top of the tool icon area..
Click on this image to see a larger version
The
Undo
History
panel records each photo-editing step, so you
can easily go
back in time to correct any bodges, or go back to try out
something else.

Opening up a photo
into Gimp.
File
> Open …. keyboard shortcut: Ctrl + letter O
Browse through your folders to find the photo ~ do 2 mouse clicks on it.
To open up more than one photo at a time, (4 max., I suggest), keep
your Ctrl key pressed down while selecting them. Alternatively, you can
select the first photo, press down the Shift key, and select the last photo
in the row, which will also select any photos in between.
Using
Gimp to “scale” …. to
reduce image size & quality
To reduce the size of
one of your photos, I advise that you select "Image"
on the top toolbar (just above your photo), and then select
"Scale image"
from the drop-down menu.
This
will bring up the Scale image box.
Just to the right of the width & Ht. boxes, you will
see two chain links close
together … the width & height
boxes are chained together …change the
width value, and you’ll see the height
value change automatically, in the
same aspect ratio, when you click on the Scale button. If you wish to
change just the width and height values independently of each other,
then
simply click on the chain link to break it, before your alter the
values.
If
your image is in
landscape format, you will see the width value
highlighted in blue.
Simply type in the pixel value you'd like. Click
on the
Scale button, and you will now see a smaller photo on
the screen..
(There is
a Scale tool icon in the left hand tool box, but it doesn't work
as well for me).
Save
your work … File > Save
As Export (this is new for 2012)
There
is a keyboard shortcut for
this
...
Shift + Control + the
letter E
.
For
website use, you should now type
a new name for your photo,
straight over the blue-highlighted
lettering). The name must be all in
lower case,
with no gaps between any of the letters or numbers.
Choose a short name (with 4-5
characters in it).
If you're saving
your reduced sized image for other use, say to go on
a Flickr site, you could just tag a letter onto the image number, such
as the letter "r",
which will make your small image stand out in a list of
all
your photos in your general photo
folder. (View > List).
Select
where to save your photo.
Press
Save
If you now see an “Export Menu” on your screen, press Export.
On
the Save As
Jpeg menu, you
could now reduce the quality of the
image to say 80% or 90%, to reduce its overall size even further.
To find out more about the photo you've just saved, select Image on the
top
toolbar (TTB) > Image
Properties.
Cropping
Select the CROP tool (the scalpel blade icon) from the left hand toolbar.
Use
it to select an area inside your photo, which you wish to keep.
You
can adjust the boundaries of your selection by clicking inside the
boxes at the edges of your selection, and dragging them to a new
position. You can also click inside your selection and drag it to a new
position.
To exit your selection, click on the grey area.
To crop, press the Enter key on your keyboard ~
this will trim off the
grey areas. Or more simply, just click inside the area you're saving.
Afterwards, you can undo the cropping by clicking on the "Base Image"
in the Undo History palette / dialog, to go back to your original photo.
Save
your work ... File > Save
As Export (this is new for 2012)
... Shift + Control + the
letter E
Save at 100 % quality
Flipping
The FLIP tool is between the Crop tool & the Text tool (letter A) in the
left hand toolbar. Select this, and you’ll see options to flip horizontally
or vertically.
Click on your photo to flip it. Click the photo again to flip
it back again if you wish.
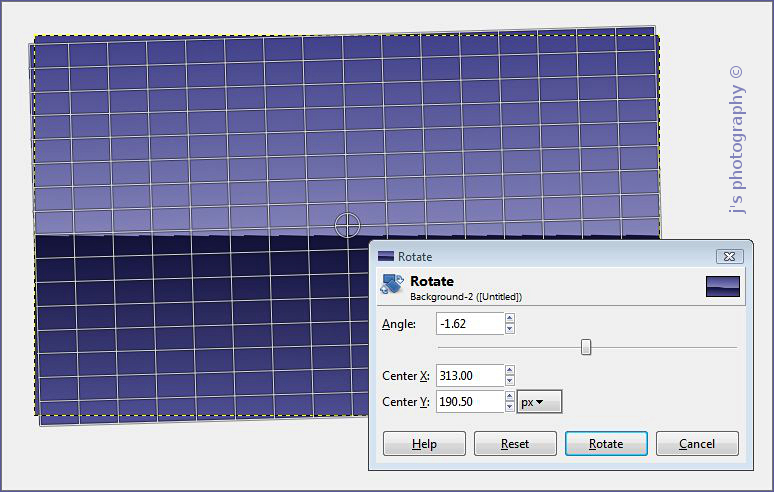
Rotating
The icon for this is next to the Crop tool. Select
this, and click on
the photo.
Here, you have options to just click on the photo and drag/rotate
it to
a new position... or you can change the angle in the menu
box. Click on "Rotate", and
you’ll see that this has trimmed off
some of the photo and also has created transparent
edges. You
can trim off these with the Crop tool. Alternatively, you might
wish to fill in
the transparent areas with the Clone tool, if
appropriate.
Click on this image to see a larger version |
File > Export (Shift + Control + the
letter E)
> adjust the
quality setting (to 100% or less) & then
Save.
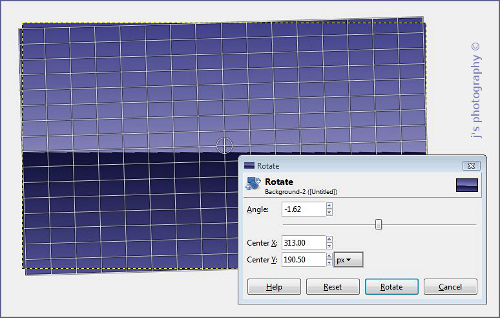
If
you are using an old version of Gimp, to correct a sloping sea
horizon using the Rotate
tool, you
can open up a grid ....
View > Show Grid. To close the grid, click on View again,
and click on Show grid again (to remove the tick mark).
With the latest version of Gimp (2.8.2), the grid opens
automatically (as shown above).
Another way of checking that something is level, is to open up
another
photo , and then to drag its top edge just below the
horizontal on the photo underneath. Or you can drag the top of
the Rotate tool menu just below and along the horizon, to check
it's all level (as shown above).
To rotate your
photo by 90 degrees, you can easily do this in
Gimp ....
Image > Transform > Rotate clockwise / anti-clockwise. This is handy
if you wish to add a copyright notice in text near the edge of a photo.
Making verticals more vertical
with the Perspective tool
You will notice when photographing buildings, towers and lamp
posts, that verticals will tend to slope inwards. To correct this,
select Tools > Transform tools > Perspective. Now click on each
of the top corners of your photo, and drag them upwards and
outwards, to improve your verticals. Press "Transform" on the
menu, to finish. Save in the usual way.
You might have to shrink your photo down a little with the Zoom
tool, to give you better access to the top corners of your photo.
You might also find that this process flattens the building a little.
Using the Clone and Zoom tools
The
tool for this is the rubber stamp icon towards the bottom of the left
hand toolbar. Have a look at a YouTube video on how to use this tool.
Here is one of several videos ...
https://www.youtube.com/watch?v=r0I40BOgGgY
Use the Zoom tool to magnify the image if
appropriate, say if you wish
to remove a tiny blemish from someone’s face. With the Zoom tool, note
that you
can select zoom in
and zoom out,
in the lower left hand
toolbox.
Another way is to press down the Control key (to change
direction), which works sometimes. When zooming in, click on the
centre or on the part of the image you especially want to see.
Otherwise the whole image can veer away from you.
After clicking on the Clone tool, you’ll see loads of options for the tool,
in the lower section of the toolbox. For example, click on the brush box,
and then you can select different brush sizes
and styles. I use a soft brush
(fuzzy circle) for touching up portraits and I make the
brush low opacity
also
(about 25%). I use this to dab colours/tones/textures from
surrounding
areas to cover up a facial blemish. You can use the square
bracket keys
on your keyboard (next to the letter P) to adjust the size of
your brush.
Select
a patch of your image you wish to copy (Ctrl + mouse click), and
then
paste the patch where you wish (with a mouse click). If you have
area to cover up, you could perform a series of mouse clicks or use one
continuous sweep of your mouse.
To undo any bodges: either use the “Undo History” dialog to go back in
time, or press the Control key + the letter Z to go back one step at a time.
To move to another part of an enlarged
image, press down the space
bar,
click onto your image and drag it around. Let go of the space
bar when
finished.
Changing
the colours in the Colours palette.
This is very easy to do.
Click on the foreground or the background colour box, in the toolbox on
the left hand side. (Black is the standard / default colour of the
foreground colour box, and white is the default colour for the background
colour box).
Click
on a colour from the vertical rainbow, and then click on a colour you
like inside the larger colour box alongside.
You could make a note of the RGB values and the HTML notation (the
hex
value) if you like, for future reference.
Press
OK.
There
are a series of “web-safe” colours which you can see
here ….
http://www.lynda.com/resources/webpalette.aspx
Web-safe means that if a
viewer has an ancient computer,
then he/she
will be able to see these basic colours (unless he/she is colour-blind).
So
you could make a note of which basic colours you’d like to use by
noting
the HTML code (eg light grey is #CCCCCC), and then you could
enter this code in the HTML box of the Gimp colour menu, and then
press OK.
Lynda now says not to bother with
these web-safe colours, unless
you've been used to using them in the past.
You
could also chose
colours with the Color Picker tool. This is next
to the Zoom tool. You could use this to click on say the blue colour of an
iris flower, and then you could use this colour to create
a matching
border around your flower photo, or a matching text colour if you
wish to
add text to your photo.
To flip the
Foreground (FG) & Background (BG) colour boxes around,
press the letter X on your keyboard. You can also click on the tiny
double arrow just alongside the colour boxes.
To get your original black
& white colours back, press the letter D on
your keyboard.
Creating a new blank white
canvas (to
colour in or to add text to).
File >
New (keyboard shortcut ~ Ctrl + letter N).
In Template, chose a standard size, if you so wish .... or, below
this,
fill
in the dimensions in pixels you’d like.
Note the options you could have … portrait / landscape view,
resolution,
RGB or greyscale, & fill with FG or BG colour. The standard
resolution
of 72 px per inch is OK for most things.
The other most
commonly used resolution is 300px
per inch, which
you’d use when printing out an
image (especially one
with text on it).
For printing, you need about 4 times as many pixels in your image,
as you do
for display on a computer
screen, to produce a good
quality print.
Another
way of making a white canvas is to open up any photo, and
then select Edit (on the TTB) > Fill with BG colour.
Using
the Bucket Fill tool (BFT).
The
icon for this tool is just below the Scale tool.
Select this, and you’ll see a load of options for you in the box below,
in
particular options to fill with FG/BG colour, and to lower the
opacity of
the colour if you wish.
Just
click on the white canvas to splash on the colour.
Using
the Blend tool (similar to the Gradient tool in Photoshop)
The icon for this
is next to the Bucket Fill tool.
Select
the Blend tool, and have look at the options you’ve got in the
Blend box below the icons.
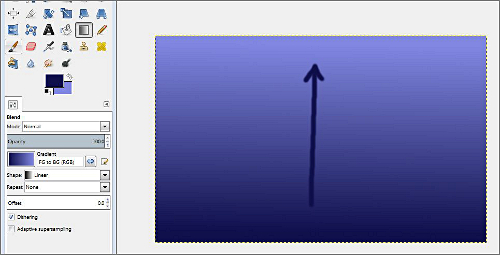
Click on this image to see a larger version
|
You
will see in the above photo, that I’ve chosen two blue colours, an
opacity of 100%, & a linear shape.
Click
on a white canvas with the Blend tool, and drag it from the bottom
to the top of the canvas. Then
let go of your mouse.
Clear
the screen by Crtl + Z, or click on the white canvas in “Undo History”
and have a go using the Blend tool in other directions, and for different
ldistances and starting points. Also try out other shapes in the Blend box.
Save your work …
File > Export or ... Shift + Control + the
letter E
| Next Gimp
page |

|
|


