Home
Photos
WordPress
Inkscape
Weebly
Flickr
& Picasa
|
|
Changing
the header images
in the WordPress 2011 theme,
by substituting
them with your own.
I've tried
various ways of changing the header images in the
WordPress 2011
theme. I found out that you need to replace them
with images which
are identical in size (and name also) …
|
|
|
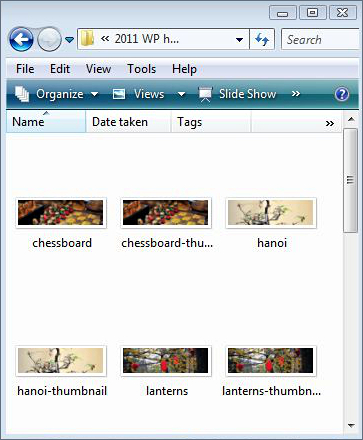
If you have a
look at the screenshot above, you will see that there
are two sizes for
each photo … in fact there are 8 different photos,
making 16 images
in all to substitute with your own photos.
The dimensions
are 1000 x 288 pixels for the header images,
& 230 x 66
pixels for the thumbnail images.
The sizes in
kilobytes range from 38-93 KB (mean: 60 KB) for the
headers and
3.68-8.17 KB (mean: abt. 5 KB for the thumbnails.
You will need to
retain the same titles for the headers and
thumbnails, so
for example, you should create new images
entitled
“hanoi.jpg” and “hanoi-thumbnail.jpg” … all in lower case. |
|
|
The images rotate
in random order when viewed on a webpage
online, so if you
don't have enough suitable photos ready, you
could use say 4
photos, using one of them to replace both
“chessboard”
and “hanoi” temporarily, and another one to replace
“lanterns”
and “pine-cone”, etc..
Creating a new
header image
You will need to
use or do the following in Gimp (see my Gimp page 1
or use Photoshop)
… the Crop tool, scaling your image down in size,
keyboard
shortcuts for copy & paste, and the Move tool.
create two
yellow folders on your Desktop, one entitled say:
“old wp
images” and the second as “new wp images” for your
replacements.
-
Create one
blank white canvas, 1000 x 288 px
Do a rough
selection of your header image from one of your
prized photos with
the Crop tool.
-
Scale the
width of your selection down to 1000px. Hopefully
the height value
will be slightly above 288px, as you will now
use the Crop tool to
edge the height slowly down to 288px or
more likely 287px. Use the
“Undo History” box to go back in
time, if you over-crop the
image.
So you've now got a header image most likely at 1000 x
287px.
If the image
is exactly 1000 x 288px, you can now save the
image (Shift + Ctrl +
E) using one of the titles: such as
“hanoi.jpg”. Save it
probably at about 90% quality to reduce
the end-kilobyte size down
to less than 100 KB. You might
have to re-save the image at a lower percentage quality to
lower the overall
size.
You can now
create the thumbnail image, by scaling it down
in Gimp to 230 x 66
px. Save the thumbnail as above, with
the title say as
“hanoi-thumbnail.jpg”.
If your
header image is at 1000 x 287px, which is likely, you
will need to
copy and paste it onto the white canvas you've
created above.
Select the
header image … Ctrl + A.
Copy it … Ctrl
+ C
Paste it onto the white canvas … Ctrl + V
Use the Move
tool to re-position the image on the white
canvas, if it's a fair
bit smaller than the canvas.
Flatten the two
layers to one layer
… Layer (on top toolbar) > Flatten image
Remove the
“marching ants” … Shift + Ctrl + A
(or Select > None)
Save the image
as above.
Re-size it down
to thumbnail size, and save this as above.
Put all your new
images into the new folder: “new wp headers”
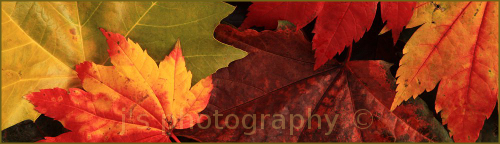
Here's an
example of one of my letter-box photos, which
I've re-named as
pine-cone.jpg
(I've reduced
the image size, to fit it into this webspace)
. The next task will be to get all your new images posted online, which
I go into on the next webpage ... click on "Next" below.
|