Home
Photos
WordPress
Publishing
Linking, SEO
Weebly
Flickr
& Picasa
|
|
All about photos
Formats ... jpeg, png, raw, etc..
Downloading photos from your camera.
Creating folders and naming them
Moving photos around.
Viewing photos with XnView
Storing your photos
Formats, sizes and quality
Web
designers use small, low quality photos on their websites. Such
photos
will download (& appear on readers' screens) much faster than
larger photos, when people come and visit
your website. Small photos
would look terrible if anyone were to print them out (say for a poster),
and so will discourage people from copying your photos..
The ideal width for a photo in landscape format, on a Flickr
site is 700-
800 px or less. The photos on this website are about 450-600 px in
width. As regards placing an image onto a website page, such as
this one, you'll have to make sure that your image will
fit inside the area
you've chosen.
GIF
photos for use in a website, tend to be much smaller ~ about 120 px
in width and about 8-10kb in overall size….very small. GIF photos
have a
simplified range of colours in them.
JPEG
or PNG photos are usually around 70-100kb in size…
much
smaller than an original 3-10MB photo.
RAW images are what your camera initially takes when you snap a
photo. All the pixels are preserved in a RAW image, at high quality.
These images are usually compressed by your camera to create
JPEG images, which are smaller and easier to handle (and email to
family and friends).
My Canon 5D Mk II camera takes RAW images which are about
25 MB in size. I've also set my camera to take high quality JPEG
images as well, which are 6-9 MB in size. The brilliant thing about
RAW images is that after you've taken the photo, you can tweak the
exposure, white balance, sharpness and shadow detail ... and so
help you use photos you might have otherwise lobbed. This is
especially important if you're taking photos at a family wedding,
where you only have one chance of getting it right. If the bridegroom
is dressed in black & white, and the bride is all in white, then you've
got major problems in getting the correct exposure. In this situation,
it's best to take RAW images & also to use top quality & high GB
camera memory cards, e.g. the most expensive in the Sandisk
range.
If you'd like more information about any of these formats, I can
recommend you have a look at articles on Wikipedia.
Here's Wikipedia on RAW images, which includes info on a variety of
free and paid-for software you can use to tweak and convert RAW
images ... http://en.wikipedia.org/wiki/Raw_image_format
....................................................................................................
Downloading
photos from your camera memory card
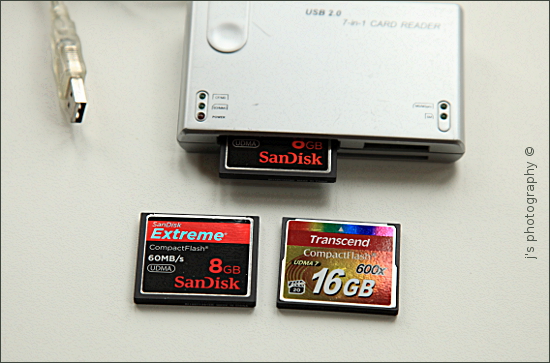 |
I use a (multiple) card reader for speedy boarding of my photos
onto my computer. Card readers can be bought cheaply from
Amazon, but check out the customer reviews before purchase,
to check their quality and durability. If you are into taking RAW
images (which I would recommend), get several large memory
cards ... you get what you pay for in terms of quality & performance.
Plug your card into the reader, & then plug this into the USB port
on your computer. When the Autoplay menu pops up, select “Open
folder to see files”. Then click on DCIM (for my Compact Flash
cards), to see folder (s) of photos inside.
Drag & drop an entire folder onto your Desktop (and then
rename it), or open the folder and then drag & drop the photos
inside it, into a new folder on your Desktop. To move a batch of
photos from your camera card folder, see above.
When you've finished, before removing your camera card, click
on the little green icon on the bottom taskbar. Click on the following
pop-up messages ...
“Safely remove mass storage device”
“This device can be removed safely from your computer”.
Now you can remove your card reader / memory card.
If you lose the AutoPlay menu at any time, you can access your
camera card via the Start Menu > (My) Computer … look for
the name of your camera card, and click on it.
It's best to delete any photos from your camera memory card, when
the card is back inside your camera. It's not considered a good idea
to delete them while the card is linked to your computer.

Creating folders and naming them
To create a new folder for your photos (and a parent folder for your
photos of 2012) on your Desktop …
Rt mouse click on the Desktop > New > New folder.
Type a name straight over the blue-highlighted lettering...
.... eg 0912 Nottm (for your photos of Nottingham for Sep 2012)
Click twice just outside your folder to complete the process.
(Do a right mouse click on the folder, to see options such as copy,
rename & delete)
I imagine that most people keep their photos in Pictures / My Pictures,
however I've found that keeping them on my Desktop is handier.
I now create a new parent folder for my pics, after each back-up,
and just give it a name such as "PHOTOS 6". I do the next back-up
for all the photos in this folder in a month or so, which simplifies the
whole process. I keep about 1,500 photos each year, by the way.
Moving photos from one folder to another
Have a go at opening a new folder, click on the middle top right button
on the top toolbar to resize your folder.
Now have a go at moving the folder around (click on its toolbar and
drag it around with the mouse, to a new position, & also try re-sizing
the folder by clicking and dragging an edge or a corner around.)
Position a folder of photos next to this, and move photos across to
the empty one, by clicking and dragging it across.
You can move a bunch of pics, by lassoing them with your mouse,
and then dragging the bunch across to the new folder. One mouse
click on a photo & then press Ctrl + the letter A, will select all the
pics in the folder, to move them all across. You can also copy and
paste from one folder to another, via right mouse clicks. You can
move photos on your Desktop into a folder, by this dragging
method.
I also create a”rubbish” folder on my Desktop, to move across
pics I don't want to keep in a folder. You can then drag the rubbish
folder into the Recycle Bin, when you so wish. This saves me a lot
of time, as I don't get the Windows prompts asking if it's OK to
delete the photos.
If you wish to retrieve a folder from the Recycle Bin, click on it to
open, and then do a right mouse click on the folder > Restore (to
its former position on your computer).
Viewing photos with XnView
The photo-viewer you get with Windows is very good
in many
ways, but I think that XnView is even better for displaying
full-sized photos and for slide-shows. XnView gives you
full-screen photos,
with no toolbars showing, and also allows
you to set the speed of the slide-show. Slide-shows with
Windows and with Flickr run too fast for me.
XnView is very simple to download from
the internet … just
google “XnView download”. I chose the
standard version
(v1.99.5). After installing it, you can open it up from the
Desktop /
from the Start menu ... I keep only one XnView
shortcut icon on my computer, on the Start menu.
To access the photo-viewer
and slide show, just click on the
centre coloured film strip on the
top toolbar, (next to the
camera icon), and then select “add a folder” of photos (to
add a folder from anywhere on your
computer). I keep my
photo folders on my Desktop, so they appear in
the selection
box straightaway.
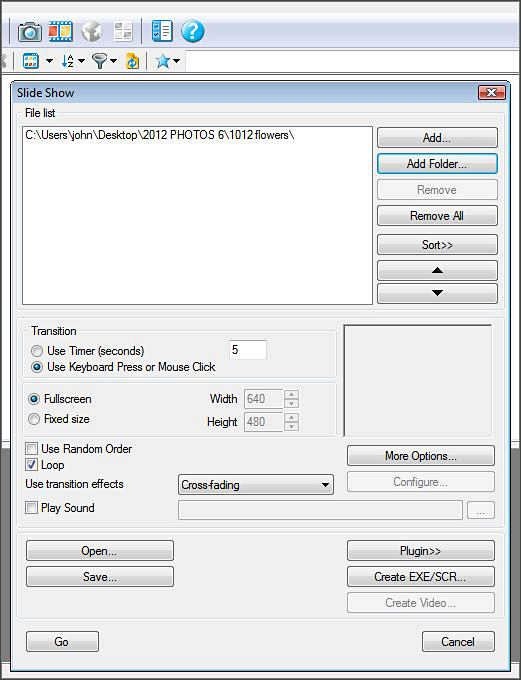
You will see from the image below that
you will have two main
options for viewing photos … firstly, viewing photos one by one,
using
the keyboard arrows or by clicking your mouse, &
secondly, you could choose the slide show facility,
where you
can set the timing in seconds. Then press “Go” to
start.
On each image, you will see the image number (& also the
location of your photo). This info is displayed at the top left
edge of the
photo. Unfortunately this becomes invisible
against a white background,
which I think is the main downside
of using XnView. So if I'm selecting
photos to keep or throw
away, I use Windows' photo-viewer for this, so I can
jot down
the relevant image numbers, but for showing photos to
family
and friends, I use XnView every time. I invite you to try it
out.
 |
The next image was a full-screen view of one of my flower
photos when using XnView. The image number & location
are situated at the top left.
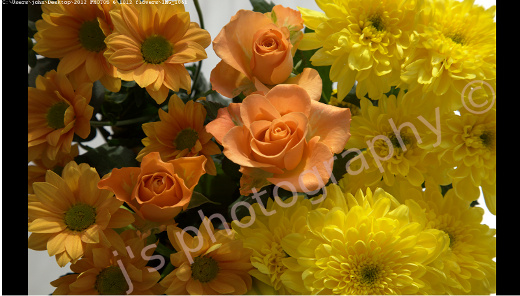
click on the flower image to see a larger version |
(As regards adding my copyright info to this image, I used white text, Sans font,
92 pixels on top of an image, 1024 px in width. I then faded the top layer of
text to make it look slightly transparent, by lowering the opacity of the top
layer ... you will see the opacity setting at the top right of the Layers dialog box
in Gimp. To rotate the text, select "Tools" on the top toolbar > Transform >
Rotate... rotate the image & press "Rotate".
Next, I flattened the two layers down to one layer, reduced the size of the image
with view to fitting it into the space on this website page & then saved it, all as
described in my Gimp pages. The image you can see now is 520 px in width ...
the larger image is 800 px in width.)
Before you start photo-editing
... store
copies of your originals.
You must
make sure that you've made a copy of all your original photos,
that you wish to change in Gimp. It's so-oo easy to go over an original
photo and lose it forever.
One idea is to copy a
folder of your photos (Rt mouse click > Copy), and
then to paste it
somewhere else, eg your Desktop (Rt mouse click > Paste).
Also back
up your photos by burning them onto a CD-Rom or a DVD,
at least once a month. You could also save them onto a flash drive,
or by keeping them as long as possible on your camera memory card
... buy extra memory cards to use with your camera.
If you're putting a folder of photos into your
Recycle Bin, don't empty
the bin for at least a month, just in case you lose your copies by
accident.
Other
storage options include storage in "the cloud" with say
Google Drive,
SkyDrive or Dropbox or saving your images full-size on
Flickr. You might
also wish to consider storage using one or two external
hard drives. Use
at least 2 ways of backing up your pics in case one of
them fails
on you.
A cautionary tale ... I know of one top amateur photographer in
Nottingham, who backed up all his photos onto an external hard drive ...
one day the hard drive failed completely on him, and he lost his entire
photo collection.
So my message to you is ... back up, back up and back up.
....................................................................................................
| .............................
Gimp page 1 |  |
|